ArcGIS Urban has three user interfaces (UIs): the overview, the experience to view plans and projects, and the experience to edit plans and projects.
Note:
Urban has two UI appearance modes: light and dark. Click the user button at the upper right of the app to change the mode.
Overview user interface
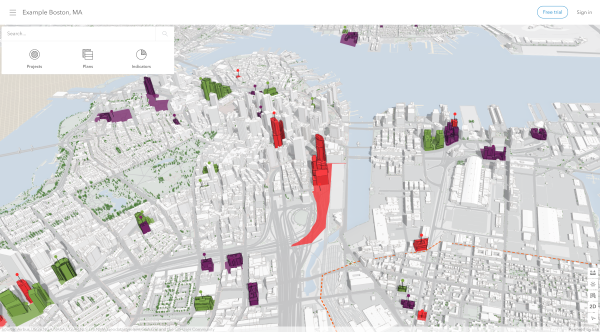
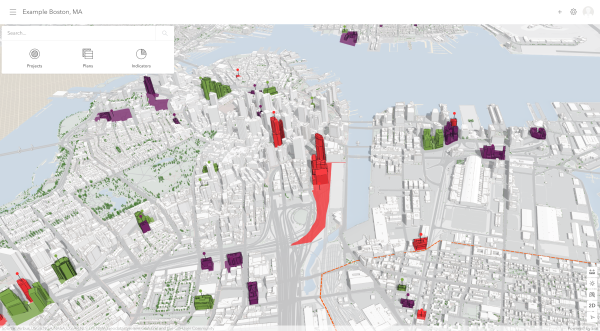
The overview is a complete view of all plans, projects, and indicators in a city. The overview UI contains the following key elements:
- The view—A 3D model of a city with plans and projects represented by multicolored buildings, study areas, and pins. Hover over a pin to get more details about the plan or project.
- The search panel—An interactive side panel with search and filter functionality with a list of plans, projects, and indicators.
The overview is the first thing you see after starting ArcGIS Urban. Depending on your permissions, the overview can be either read-only or the starting point for creating and editing plans, projects, and indicators. As an administrator, you can configure Urban using the data manager in the overview.
The following images show the overview UI (with and without editing permissions):
Plan and project viewing experience
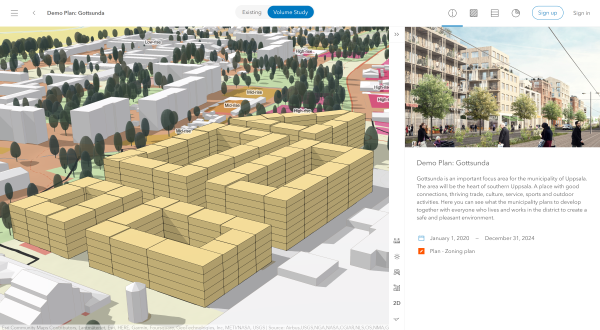
The viewing experience is available to users who don't have an Urban license assigned. The viewing experience allows you to explore the details of a plan or a project. To view a plan or a project, use the search panel or click the corresponding location pin in the overview. Click the Return to overview button  to close the viewing experience and get back to the overview.
Plan and project editing experience
The editing experience is available to users with an Urban license. The editing experience allows you to view and edit the content of a plan or a project if you have the appropriate permissions. See Workflow accessibility for details. To edit a plan or a project, use the search panel or click the corresponding location pin in the overview. Click the Return to overview button  to close the editing experience and go back to the overview.
Plan editing experience
While editing a plan, the UI is divided into the following modes, which are displayed to the right of the header:
- Details
 —View a thumbnail image, the plan description, the start and end date of the plan, and edit the study area.
 - Zoning or land use
 —Edit and configure zoning or land use (depending on the type of plan you are editing), overlays, and parcel overrides.
 - Development
 —Edit parcel geometries, apply building types, generate buildings, design and edit spaces, demolish parcels, and assess parcel suitability.
 - Dashboard
 —View metrics for the scenario. Change chart types and arrange metrics on the dashboard.
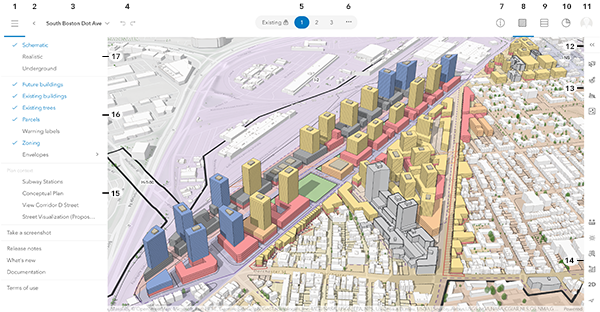
The numbered plan editing experience UI items are described in the following table:
| UI item | Description |
|---|---|
1—Menu button | Open and close the layer side panel. |
2—Return to overview | Close the plan editor and go to the overview. |
3—Plan options | Export a scenario to a web scene, share the plan, or access the plan configuration. |
4—Undo and redo | Undo and redo changes. |
5—Scenario switcher | Switch between scenarios. |
6—Configure scenarios | Add and configure scenarios. |
7—Details mode | Open the side panel to view a thumbnail image, read the plan description, see the start and end date of the plan, and edit the study area. |
8—Zoning mode | Open the side panel to edit and configure zoning, overlays, and parcel overrides. In a land-use plan, the option is Land Use. |
9—Development mode | Open the side panel to develop parcels and edit spaces. |
10—Dashboard mode | Open the side panel to show and edit the dashboard with its metrics. |
11—Sign-in button | Sign in or out and switch accounts. |
12—Expand button | Expand and collapse the side panel. |
13—Workflow toolbar | Use tools based on the active mode. |
14—View toolbar | Use tools to adjust, navigate, and analyze the view. |
15—Context layers | Turn layers on or off. This list is only available if you have added context to the plan or scenario. |
16—Design layers | Turn layers on or off. |
17—Basemaps | Switch between basemap views. |
Project editing experience
While editing a project, the UI is composed of a toolbar at the bottom of the view and the following modes, which are displayed to the right of the header:
- Details
 —View a thumbnail image, the project description, and the start and end date of the project.
 - Dashboard
 —View metrics for the scenario study area. Arrange metrics on the dashboard.
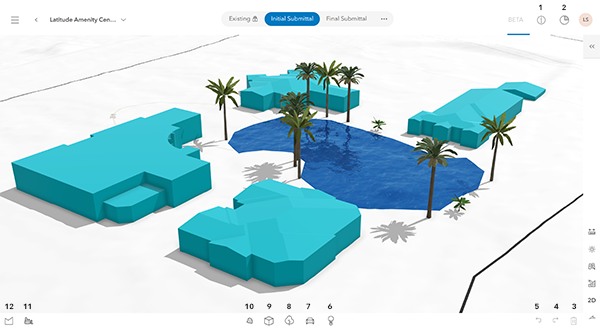
The numbered project editing experience UI items are described in the following table:
| UI item | Description |
|---|---|
1—Details mode | Open the side panel to view a thumbnail image, read the project description, and see the start and end date of the project. |
2—Dashboard mode | Open the side panel to show and edit the dashboard with its metrics. |
3—Delete | Delete ground, buildings, trees, vehicles, and street furniture objects from the view. |
4—Redo | Redo changes. |
5—Undo | Undo changes. |
6—Street Furniture | Choose from a variety of objects to place in the project (for example, streetlights or benches). |
7—Vehicles | Choose from a variety of vehicles to place in the project. |
8—Trees | Choose from a variety of trees to place in the project. |
9—New building | Draw buildings by defining height and drawing a footprint. |
10—Ground | Visualize the ground. Choose from water, concrete, or grass. |
11—Demolish | Remove what is currently within the project boundary. |
12—Study area | Edit the study area of the project. |